Related Resources: Design and Engineering General
Spherical Indentation Stress-Strain and Compressive Yield Stress
Strength of Materials and Engineering
Extracting Stress-Strain and Compressive Yield Stress Information From Spherical Indentation
21 pages
Thomas F. Juliano,
Mark R. VanLandingham,
Tusit Weerasooriya, and
Paul Moy
Weapons and Materials Research Directorate, ARL
Analytical determination of vibrations
and friction torque due to rotation,
taking into account the hydrodynamic
action of a lubricating oil film, and
determination of the elastic and damping
characteristics of bearings and bearing
assemblies are some of the problems
considered in this book. The methodology
and techniques of measuring the
dynamic characteristics of bearings are
presented. Experimental data and the
methodology of statistical analysis are
also given.
The book is intended for scientists and
engineers engaged in the instrument
manufacturing and machine building
industries.
This resource requires a Membership (Premium)
Open and view: Spherical Indentation Stress-Strain and Compressive Yield Stress
Introduction:
Depth-sensing indentation, also referred to as nanoindentation, is a technique in which a hard indenter tool (usually made of diamond or crystalline Al2O3) is pressed into a sample surface while load and displacement are measured continuously. It is commonly employed to find elastic modulus and indentation hardness properties of various materials on the microscale (1–3). Because indentation crudely resembles a uniaxial compression test, it may seem that stress-strain relationships may be readily discerned from load-displacement data for any tool geometry. However, it has been shown that such a relationship is unique to nonself-similar indenter geometries (i.e., a sphere) but not to pyramidal or conical indenters (4).
Pioneering work to determine expressions for indentation stress and strain was done by Tabor and focused primarily on the response of metals to contact loading (5). Since that time, a number of studies have attempted to describe indentation stress-strain curves with some promising success (6–12). These works have concentrated on a limited modulus range or specific class of material. However, no general study exists that proposes an easily implemented, general framework to estimate the elastic modulus and yield stress of a material for spherical indentation, exclusively using the loading-curve data. Such a procedure is developed in this work, and a number of materials important for military applications are used to exemplify the approach. This work is especially useful in measuring mechanical stress-strain curves on materials that cannot be measured through bulk measurement or materials that are heterogeneous at the microscale. Examples include single material grains, thin films, and microelectromechanical system components.

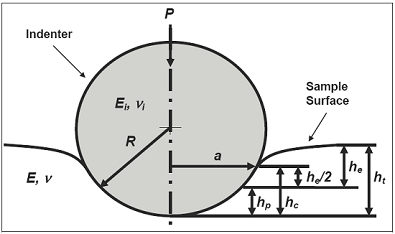
Figure 1. Schematic of indenter contact with a sample surface. (A number of variables from equations 1–5 are depicted.)
Content:
List of Figures iv
List of Tables iv
Acknowledgments v 1.
Introduction 1 2.
Theory 1 3.
Experimental 5 4.
Results and Discussion 6 5.
Conclusions 11 6.
References 12
Distribution List 14
Figure 1. Schematic of indenter contact with a sample surface. (A number of variables from equations 1–5 are depicted.) .2
Figure 2. Curves showing true stress and true strain for compression data (solid lines) and 20-µm-radius indenter data (dotted lines). Curves are shown for (a) Ti-6-4, (b) RHA steel, (c) WC-Co, (d) PMMA, and (e) PC 9
Table 1. Compressive yield stress values for Ti-6-4, RHA steel, WC-Co, PMMA, and PC measured using compression testing and elastic modulus values measured using ultrasonic testing (Ti-6-4, RHA steel, and WC-Co) and DMA (PMMA and PC)..7
Table 2. Elastic modulus and compressive yield stress values estimated from indentation testing of Ti-6-4, RHA steel, WC-Co, PMMA, and PC using a 20-μm-radius indentation tip.7
Table 3. Elastic modulus and compressive yield stress values estimated from indentation testing of Ti-6-4, RHA steel, WC-Co, PMMA, and PC using a 50-μm-radius indentation tip..7
Table 4. Elastic modulus and compressive yield stress values estimated from indentation testing of Ti-6-4, RHA steel, WC-Co, PMMA, and PC using a 500-μm-radius indentation tip.
Related:
- Contact Stress Sphere in Contact Flat Surface Equation and calculator
- Contact Stress Two Spheres in Contact Same Material
- Stress in Sphere and Hemispherical Head Seam Equation and Calculator
- Contact Stress Sphere Calculator on Concave Surface including Formulas
- Sphericity of Sphere Formulas and Calculator
- Spherical Cap Segment Volume and Area Equation and Calculator
- GD&T Spherical True Position Tolerance Calculator and Equation
- Spherical Sector Rotataed Volume, Area Equation and Calculator
- Spherical Wedge Volume and Area Calculator and Equation
- Spherical Cylinder Stress and Deflection Equation and Calculator
- Tangential Loading Only Spherical Cylinder Stress and Deflection Formulas and Calculator
- Uniform Loading Horizontal Projected Area Spherical Cylinder Stress and Deflection Formulas and Calculator
- Spherical Cylinder Stress and Deflection Own weight Formula and Calculator
- Spherical Cylinder Stress and Deflection Equations and Calculator