Related Resources: calculators
Stud Projection Tolerance Boundary Formulae and Calculator
Engineering Tolerance Analysis Limits Fits Charts
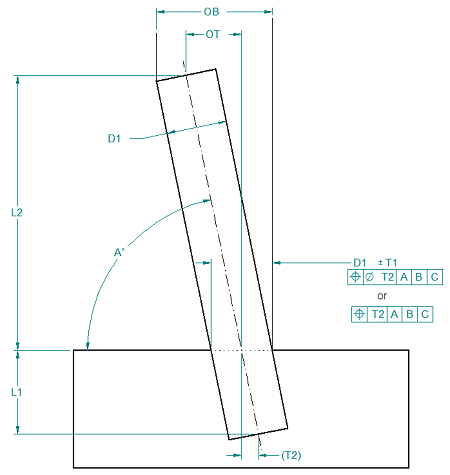
Stud Projection Tolerance Boundary Analysis Feature of Size Offset Equation and Calculator.
Notes: Projection within block material is fixed, Diameter D1 is typically MMC size.

Preview: Stud Projection Tolerance Boundary Analysis
OT / L2 = T2 / L1
or
OT = ( T2 / L1 ) L2
A° = atan ( T2 / L1)
OB = T2 ( 1 + ( 2 L2) / L1 ) + D1
Where:
D1 = Diameter of stud, shaft, projection (in, mm),
D2 = Diameter or width of projection (in, mm),
T1 = Size tolerance (in, mm),
T2 = Position tolerance for threaded feature/press fit (in, mm),
L1 = Threaded or interface length in material (in, mm),
L2 = Projected length in material (in, mm),
OT = Center line offset at worst case position tolerance (in, mm),
A° = Angle (deg.)
OB = Outer boundary / Actual mating envelope (in, mm)
Note: Keep units consistant in within, mm with mm.
Author K. Bramble
Related:
- ASME Y14.5-2018,
- ASME Y14.5-2009,
- ISO 1101
- Fixed Fastener Projected Tolerance Zone Compensation Calculator