Design for Extrusion Considerations, Tolerances and Review
Aluminum Extrusion Dimensions Tolerances SpecificationDesign for Extrusion Considerations, Tolerances and Review
Extrusion Design: Extrusion is a process that forces metal to flow through a shape-forming die. The metal is plastically deformed under compression in the die cavity. Extrusion processes can be carried on hot or cold materials. Extrusion differs from drawing in that the metal is pushed, rather than pulled under tension. Typically setup cost for extrusions are expensive. This due to tooling cost and setup. Actual manufactured part cost is inexpensive when produced in significant quantities. Intricate geometries are possible such as hollows and undercuts. Tight tolerances' are not typical to the extrusion process. Materials that can be extruded are copper, brass, aluminum, steel, plastic and others. Aluminum, plastic and copper are most suitable for extrusions.
TOLERANCES
Factors, which affect tolerances include wall thickness, Dimension size and location, profile type - solid or hollow, alloy used, cross section And the part's application. While standard industry tolerances usually provide adequate precision for most applications, tolerances Less than standard are indeed possible. When designing extrusion remember that radius are opposite to that of machined components. The radii are established by the shape-forming die. Sharp corners are not considered optimal try to use radius (larger the better).
ANGULAR DIMENSIONS
Angular tolerances will be +/- 1 to 2 degrees, depending on the
Dimension location.
FLATNESS
The flatness tolerance across a profile is +/- 0.004" per inch of Width.
TWIST
The approximate twist tolerance will be 0.5 degrees per foot.
STRAIGHTNESS
Extrusions will be straight within 0.0125" per foot part length.
SIZE/MANUFACTURING LIMITS
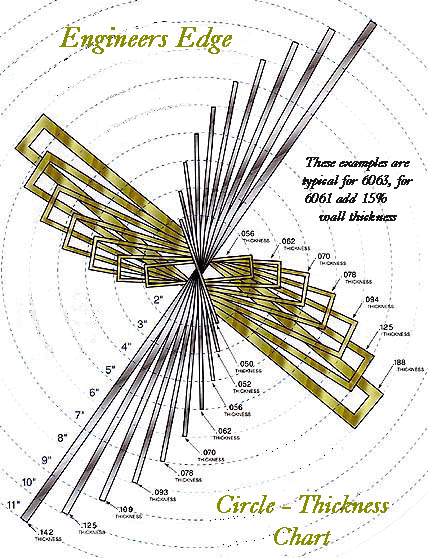
Overall cross-sectional size of an extruded component is established by the diameter of the smallest circumscribed circle that can completely enclose the internal cross section of the extruded shape. Linear cross sectional tolerances are approximately +/- 0.008 per inch of the derived cross section.
The minimum wall thickness which can be extruded for aluminum is dependant on the particular shape and the smallest circumscribed circle as, well as the alloy. Wall thickness tolerances will be approximately +/- 10% if the wall thickness. See Circle - Wall thickness chart below.
DESIGN CONSIDERATIONS
Limit the irregularities of shape as much as the function of the part allows. Metal flows less readily into narrow and irregular die sections, making distortion and other quality problems more likely to occur.
Many extrusion shops and metals suppliers provide standard shapes that might serve the designer. A good rule of thumb is to always use standard cross sections when possible.
Tolerances are advised to be liberal enough to avoid secondary drawing operations, if possible.
With all metals, and particularly with steel and less easily extruded metals, it is recommended to avoid extreme changes in section thickness.
Radius corners on a product reduces die stress and extends the life of the die. Use metal-to-metal dimensions whenever possible in dimensioning a profile as it allows for more accurate inspection. Keep profiles as uniform as possible when designing an extrusion Minimize areas that will weaken the die or impede metal flow, including transition areas from heavy to thin sections.
GUIDELINES FOR ALLOY SELECTION
| IF THE PRODUCT Requires Superior Strength |
THEN CONSIDER 6061 or 6005A |
6063 Alloy
The most popular all purpose extrusion alloy. Recommended when surface finish is critical or when material is to be anodized. More intricate shapes are available in this alloy. It machines and forms well.
6061 Alloy
Useful when additional strength or better machining is a consideration. there are configuration limitations. 6061 is not recommended for critical finishes
6463 Alloy
Basically the same as 6063 with some chemistry changes to improve response to chemical polishing processes.
6063 - Circle Chart
Common Shapes
Click on image below to enlarge
SOLID AND SEMI HOLLOW SHAPES - ALUMINUM
| Diameter of Circumscribed Circle |
6061 |
2014 |
2024 |
| 0.5 - 2.0 | 0.040 | 0.040 | 0.040 |
| 2 - 3 | 0.045 | 0.050 | 0.050 |
| 3 - 4 | 0.050 | 0.050 | 0.062 |
| 4 - 5 | 0.062 | 0.062 | 0.078 |
| 5 - 6 | 0.062 | 0.078 | 0.094 |
| 6 - 7 | 0.078 | 0.094 | 0.109 |
| 7 - 8 | 0.094 | 0.109 | 0.125 |
| 8 - 9 | 0.109 | 0.125 | 0.156 |
| 9 - 10 | 0.109 | 0.125 | 0.156 |
| 10 - 11 | 0.125 | 0.125 | 0.156 |
| 11 - 12 | 0.156 | 0.156 | 0.156 |
| 12 - 14 | 0.188 | 0.188 | 0.188 |
| 14 - 17 | 0.188 | 0.188 | 0.188 |
| 17 - 20 | 0.188 | 0.188 | 0.250 |
| 20 - 24 | 0.188 | 0.250 | 0.500 |
Typical Mechanical Tolerances for Extrusions
Straightness = .0125 inches per ft (12 inches)
Twist = 0.5 degreesper ft
Flatness = .004 x width
Wall thickness = +/- 10%
