Dye Penetrant Non-Destructive Inspection Method (NDI)
Quality and Inspection Process Knowledge
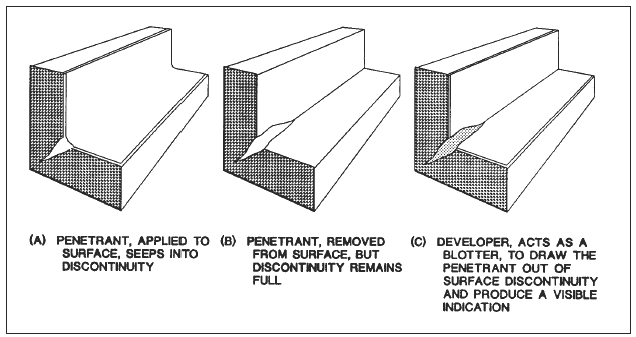
Dye Penetrant inspection is used on nonporous metal and nonmetal components to find material discontinuities that are open to the surface and may not be evident to normal visual inspection. The part must be clean before performing a penetrant inspection. The basic purpose of penetrant inspection is to increase the visible contrast between a discontinuity and its background. This is accomplished by applying a liquid of high penetrating power that enters the surface opening of a discontinuity. Excess penetrant is removed and a developer material is then applied that draws the liquid from the suspected defect to reveal the discontinuity. The visual evidence of the suspected defect can then be seen either by a color contrast in normal visible white light or by fluorescence under black ultraviolet light. (See below.)
The main advantages of Dye Penetrant inspection are the speed of the test and the low cost. Disadvantages include the detection of only surface flaws, skin irritation, and the inspection should be on a smooth clean surface where excessive penetrant can be removed prior to being developed. Conducting the test on rough surfaces, such-as "as-welded" welds, will make it difficult to remove any excessive penetrant and could result in false indications. Water-washable penetrant should be considered here if no other option is available. Also, on certain surfaces a great enough color contrast cannot be achieved or the dye will stain the workpiece.
Limited training is required for the operator although experience is quite valuable. Proper cleaning is necessary to assure that surface contaminants have been removed and any defects present are clean and dry. Some cleaning methods have been shown to be detrimental to test sensitivity, so acid etching to remove metal smearing and re-open the defect may be necessary
Applicable Standards:
-
International Organization for Standardization (ISO)
-
ISO 3059, Non-destructive testing - Penetration testing and magnetic particle testing - Viewing conditions
-
ISO 3452-1, Non-destructive testing. Penetrant testing. Part 1. General principles
-
ISO 3452-2, Non-destructive testing - Penetrant testing - Part 2: Testing of penetrant materials
-
ISO 3452-3, Non-destructive testing - Penetrant testing - Part 3: Reference test blocks
-
ISO 3452-4, Non-destructive testing - Penetrant testing - Part 4: Equipment
-
ISO 3452-5, Non-destructive testing - Penetrant testing - Part 5: Penetrant testing at temperatures higher than 50 °C
-
ISO 3452-6, Non-destructive testing - Penetrant testing - Part 6: Penetrant testing at temperatures lower than 10 °C
-
ISO 10893-4: Non-destructive testing of steel tubes. Liquid penetrant inspection of seamless and welded steel tubes for the detection of surface imperfections.
-
ISO 12706, Non-destructive testing - Penetrant testing - Vocabulary
ISO 23277, Non-destructive testing of welds - Penetrant testing of welds - Acceptance levels
European Committee for Standardization (CEN) -
EN 1371-1, Founding - Liquid penetrant inspection - Part 1: Sand, gravity Dye and low pressure Dye castings
-
EN 1371-2, Founding - Liquid penetrant inspection - Part 2: Investment castings
-
EN 2002-16, Aerospace series - Metallic materials; test methods - Part 16: Non-destructive testing, penetrant testing
-
EN 10228-2, Non-destructive testing of steel forgings - Part 2: Penetrant testing
ASTM International (ASTM)
-
ASTM E 165, Standard Practice for Liquid Penetrant Examination for General Industry
-
ASTM E 1417, Standard Practice for Liquid Penetrant Testing
American Society of Mechanical Engineers (ASME)
-
ASME Boiler and Pressure Vessel Code, Section V, Art. 6, Liquid Penetrant Examination
-
ASME Boiler and Pressure Vessel Code, Section V, Art. 24 Standard Test Method for Liquid Penetrant Examination SE-165 (identical with ASTM E-165)
