Related Resources: manufacturing
Insert Cutter Radius Compensation # 2
Manufacturing Engineering and Design
Insert Cutter Radius Compensation per. Specification ANSI B212.3
All dimensions are in inches.
80° Diamond Profile
|
||||||
G Style
|
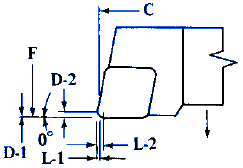 |
Turning & Facing 0° Lead Angle
|
||||
Rad.
|
L-1
|
L-2
|
D-1
|
D-2
|
||
1⁄64
|
.0030
|
.0186
|
0
|
.0156
|
||
1⁄32
|
.0060
|
.0312
|
0
|
.0312
|
||
3⁄64
|
.0090
|
.0559
|
0
|
.0469
|
||
1⁄16
|
.0120
|
.0745
|
0
|
.0625
|
||
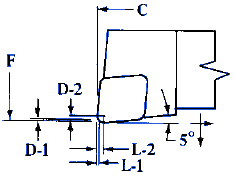 |
Turning & Facing 5° Reverse Lead Angle
|
|||||
Rad.
|
L-1
|
L-2
|
D-1
|
D-2
|
||
1⁄64
|
.0016
|
.0172
|
.0016
|
.0172
|
||
1⁄32
|
.0031
|
.0344
|
.0031
|
.0344
|
||
3⁄64
|
.0047
|
.0516
|
.0047
|
.0516
|
||
1⁄16
|
.0062
|
.0688
|
.0062
|
.0688
|
||
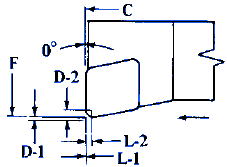 |
Facing 0° Lead Angle
|
|||||
Rad.
|
L-1
|
L-2
|
D-1
|
D-2
|
||
1⁄64
|
0
|
.0156
|
.0030
|
.0186
|
||
1⁄32
|
0
|
.0312
|
.0060
|
.0372
|
||
3⁄64
|
0
|
.0469
|
.0090
|
.0559
|
||
1⁄16
|
0
|
.0625
|
.0120
|
.0745
|
||
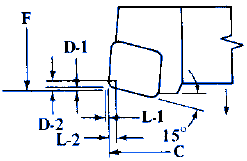 |
Turning 15° Lead Angle
|
|||||
Rad.
|
L-1
|
L-2
|
D-1
|
D-2
|
||
1⁄64
|
.0011
|
.0167
|
.0003
|
.0117
|
||
1⁄32
|
.0022
|
.0384
|
.0006
|
.0234
|
||
3⁄64
|
.0032
|
.0501
|
.0009
|
.0351
|
||
1⁄16
|
.0043
|
.0668
|
.0012
|
.0468
|
||
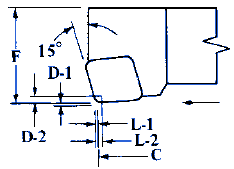 |
Facing 15° Lead Angle
|
|||||
Rad.
|
L-1
|
L-2
|
D-1
|
D-2
|
||
1⁄64
|
.0003
|
.0117
|
.0011
|
.0167
|
||
1⁄32
|
.0006
|
.0234
|
.0022
|
.0334
|
||
3⁄64
|
.0009
|
.0351
|
.0032
|
.0501
|
||
1⁄16
|
.0012
|
.0468
|
.0043
|
.0668
|
||
55° Profile
|
||||||
J Style |
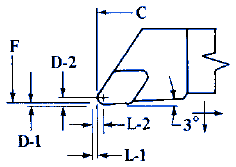 |
Profiling 3° Reverse Lead Angle |
||||
Rad.
|
L-1
|
L-2
|
D-1
|
D-2
|
||
1⁄64
|
.0135 |
.0292 |
.0015 |
.0172 |
||
1⁄32
|
.0271 |
.0583 |
.0031 |
.0343 |
||
3⁄64
|
.0406 |
.0875 |
.0046 |
.0519 |
||
1⁄16
|
.0541 |
.1166 |
.0062 |
.0687 |
||
35° Profile
|
||||||
J Style Negative rake holders have 6° back rake and 6° side rake |
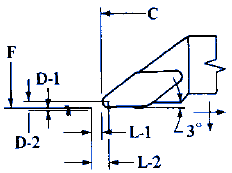 |
Profiling 3° Reverse Lead Angle |
||||
Rad.
|
L-1
|
L-2
|
D-1
|
D-2
|
||
1⁄64
|
.0330 |
.0487 |
.0026 |
.0182 |
||
1⁄32
|
.0661 |
.0973 |
.0051 |
.0364 |
||
3⁄64
|
.0991 |
.1460 |
.0077 |
.0546 |
||
1⁄16
|
.1322 |
.1947 |
.0103 |
.0728 |
||
L Style |
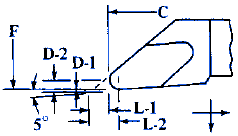 |
Profiling 5° Lead Angle |
||||
Rad.
|
L-1
|
L-2
|
D-1
|
D-2
|
||
1⁄64
|
.0324 |
.0480 |
.0042 |
.0198 |
||
1⁄32
|
.0648 |
.0360 |
.0086 |
.0398 |
||
3⁄64
|
.0971 |
.1440 |
.0128 |
.0597 |
||
1⁄16
|
.1205 |
.1920 |
.0170 |
.0795 |
||
L-1 and D-1 over sharp point to nose radius; and L-2 and D-2 over sharp point to center of nose radius. The D-1 dimension for the B, E, D, M, P, S, T, and V style tools are over the sharp point of insert to a sharp point at the intersection of a line on the lead angle on the cutting edge of the insert and the C dimension. The L-1 dimensions on K style tools are over the sharp point of insert to sharp point intersection of lead angle and F dimensions.