Related Resources: mechanical-tolerances
Measuring Pitch Diameters using Three Wire Method
Mechanical Tolerancing and Dimensioning
Measuring Thread Bolt Pitch Diameters using Three Wire Method.
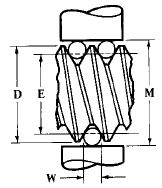
The pitch diameter of a screw thread may be measured very accurately by means of some form of dial caliper or micrometer and three wires of equal diameter. This method is extensively used in checking the accuracy of threaded plug gages and other precision screw threads. Two of the wires are placed in contact with the thread on one side and the third wire in a position diametrically opposite as illustrated by the diagram, (see table “Formulas for Checking Pitch Diameters of Screw Threads”) and the dimension over the wires is determined by means of a micrometer. An ordinary micrometer is commonly used but some form of “floating micrometer” is preferable, especially for measuring thread gages and other precision work. The floating micrometer is mounted upon a compound slide so that it can move freely in directions parallel or at right angles to the axis of the screw, which is held in a horizontal position between adjustable centers. With this arrangement the micrometer is held constantly at right angles to the axis of the screw so that only one wire on each side may be used instead of having two on one side and one on the other, as is necessary when using an ordinary micrometer. The pitch diameter may be determined accurately if the correct micrometer reading for wires of a given size is known.

Where:
M = Dimension over wires
E = Pitch diameter (basic, maximum, or minimum) for which M is required, or pitch diameter corresponding to measurement M
D = Basic major or outside diameter
W = Wire or precision gauge pin diameter
The formulas below do not compensate for the effect of the lead angle upon measurement M, but they are sufficiently accurate for checking standard single-thread screws unless exceptional accuracy is required. See accompanying information on effect of lead angle; also matter relating to measuring wire sizes, accuracy required for such wires, and contact or measuring pressure.
The approximate best wire size for pitch-line contact may be obtained by the formula:
W = 0.5 · Pitch · sec(1/2) included thread angle
For 60° threads:
W = 0.57735 · Pitch
| Thread Form | Formulas for determining measurement M corresponding to correct pitch diameter and the pitch diameter E corresponding to a given measurement over wires. |
| American National Standard Unified |
When measurement M is known, E = M + 0.866025P - 3W When pitch diameter E is used in formula, M = E + 0.866025P + 3W |
| British Standard Whitworth |
When measurement M is known, E = M - 0.9605P - 3.1657W When pitch diameter E is used in formula, M = E - 0.9605P + 3.1657W |
| British Association Standard |
When measurement M is known, E = M - 1.1363P - 3.4829W When pitch diameter E is used in formula, M = E - 1.1363P + 3.4829W |
| Lowenherz Thread |
When measurement M is known, E = M + P - 3.2359W When pitch diameter E is used in formula, M =E - P - 3.2359W |
| Sharp V-Thread |
When measurement M is known, E = M + 0.866025P - 3W When pitch diameter E is used in formula, M = E - 0.866025P + 3W |
Recommended Wire size Diameter for Measuring American Standard Threads and British Standard Whitworth Screw Threads
|
Threads
per Inch |
Pitch,
Inch |
Wire Diameters for
American Standard Threads |
Wire Diameters for
Whitworth Standard Threads |
||||
|
Max.
|
Min.
|
Pitch-Line
Contact |
Max.
|
Min.
|
Pitch-Line
Contact |
||
|
4
|
0.2500
|
0.2250
|
0.1400
|
0.1443
|
0.1900
|
0.1350
|
0.1409
|
|
4-1/2
|
0.2222
|
0.2000
|
0.1244
|
0.1283
|
0.1689
|
0.1200
|
0.1253
|
|
5
|
0.2000
|
0.1800
|
0.1120
|
0.1155
|
0.1520
|
0.1080
|
0.1127
|
|
5-1⁄2
|
0.1818
|
0.1636
|
0.1018
|
0.1050
|
0.1382
|
0.0982
|
0.1025
|
|
6
|
0.1667
|
0.1500
|
0.0933
|
0.0962
|
0.1267
|
0.0900
|
0.0939
|
|
7
|
0.1428
|
0.1283
|
0.0800
|
0.0825
|
0.1086
|
0.0771
|
0.0805
|
|
8
|
0.1250
|
0.1125
|
0.0700
|
0.0722
|
0.0950
|
0.0675
|
0.0705
|
|
9
|
0.1111
|
0.1000
|
0.0622
|
0.0641
|
0.0844
|
0.0600
|
0.0626
|
|
10
|
0.1000
|
0.0900
|
0.0560
|
0.0577
|
0.0760
|
0.0540
|
0.0564
|
|
11
|
0.0909
|
0.0818
|
0.0509
|
0.0525
|
0.0691
|
0.0491
|
0.0512
|
|
12
|
0.0833
|
0.0750
|
0.0467
|
0.0481
|
0.0633
|
0.0450
|
0.0470
|
|
13
|
0.0769
|
0.0692
|
0.0431
|
0.0444
|
0.0585
|
0.0415
|
0.0434
|
|
14
|
0.0714
|
0.0643
|
0.0400
|
0.0412
|
0.0543
|
0.0386
|
0.0403
|
|
16
|
0.0625
|
0.0562
|
0.0350
|
0.0361
|
0.0475
|
0.0337
|
0.0352
|
|
18
|
0.0555
|
0.0500
|
0.0311
|
0.0321
|
0.0422
|
0.0300
|
0.0313
|
|
20
|
0.0500
|
0.0450
|
0.0280
|
0.0289
|
0.0380
|
0.0270
|
0.0282
|
|
22
|
0.0454
|
0.0409
|
0.0254
|
0.0262
|
0.0345
|
0.0245
|
0.0256
|
|
24
|
0.0417
|
0.0375
|
0.0233
|
0.0240
|
0.0317
|
0.0225
|
0.0235
|
|
28
|
0.0357
|
0.0321
|
0.0200
|
0.0206
|
0.0271
|
0.0193
|
0.0201
|
|
32
|
0.0312
|
0.0281
|
0.0175
|
0.0180
|
0.0237
|
0.0169
|
0.0176
|
|
36
|
0.0278
|
0.0250
|
0.0156
|
0.0160
|
0.0211
|
0.0150
|
0.0156
|
|
40
|
0.0250
|
0.0225
|
0.0140
|
0.0144
|
0.0190
|
0.0135
|
0.0141
|
Related: