Internal Retaining Snap Ring Sizes and Groove Design Bore Sizes .250 - 1.500 Inches
The following is Internal Retaining Snap Ring Sizes and Groove Design Chart for sizes .250 to 1.500

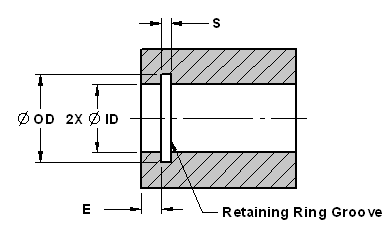
Retaining Ring Grove Dimensional Requirements

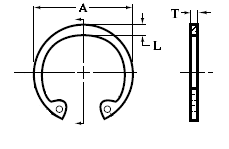
Internal Retaining ( Snap ) Ring Sive Designations
(All data is in inches.)
| Housing Bore |
Ring | Ring Groove |
||||||||
|---|---|---|---|---|---|---|---|---|---|---|
Dia. |
Diameter |
Thickness |
Diameter |
Width |
Edge |
|||||
ID |
A |
Tol. | T |
Tol. | OD |
Tol. | S |
Tol. | E |
Tol. |
.250 |
.280 .346 .415 .482 .498 .548 .560 .620 .694 .763 .831 .859 .901 .961 .971 1.000 1.041 1.111 1.136 1.180 1.249 1.319 1.319 1.388 1.388 1.456 1.526 1.526 1.596 1.616 1.660 |
---- +.015
---- +.025 ---- +.035
|
.015 |
+.002
|
.268 .330 .397 .461 .477 .530 .542 .596 .665 .732 .796 .825 .862 .920 .931 .959 1.000 1.066 1.091 1.130 1.197 1.255 1.262 1.330 1.339 1.396 1.461 1.464 1.528 1.548 1.594 |
+.001 +.002
+.003
+.004
|
.018 |
+.002
+.003
+.004
|
.027 |
Not more |
Reference: Industrial Retaining Snap Rings, 3100 Series.
All dimensions are in inches. Depth of groove d = (OD-ID)/2. Thickness indicated is for unplated rings; for most plated rings, the maximum ring thickness will not exceed the minimum groove width (S) minus 0.0002 inch. Standard material: carbon spring steel (SAE 1060-1090).
Ring Free Diameter Tolerances: For shaft sizes 0.125 through 0.250, +0.002, -0.004; for sizes 0.276 through 0.500, +0.002, -0.005; for sizes 0.551 through 1.023, +0.005, -0.010; for sizes 1.062 through 1.500, +0.010, -0.015; for sizes 1.562 through 2.000, +0.013, -0.020; for sizes 2.062 through 2.500, +0.015, -0.025; for sizes 2.559 through 5.000, +0.020, -0.030; for sizes 5.250 through 6.000, +0.020, -0.040; for sizes 6.250 through 6.750, +0.020, -0.050; for sizes 7.000 and 7.500, +0.050, -0.130.
Ring Thickness Tolerances: For shaft sizes 0.125 and 0.156, -0.001; for sizes 0.188 through 1.500, -0.002; for sizes 1.562 through 5.000, -0.003; for sizes 5.250 through 6.000, -0.004; for sizes 6.250 through 7.500, -0.005.
Groove Diameter Tolerances: For shaft sizes 0.125 through 0.250, -0.0015; for sizes 0.276 through 0.562, -0.002; for sizes 0.594 through 1.023, -0.003; for sizes 1.062 though 1.500, -0.004; for sizes 1.562 through 2.000, -0.005; for sizes 2.062 through 5.000, -0.006; for sizes 5.250 through 6.000, -0.007; for sizes 6.250 through 7.500, -0.008.
Groove Width Tolerances: For shaft sizes 0.125 through 0.236, +0.002, -0.000; for sizes 0.250 through 1.023, +0.003, -0.000; for sizes 1.062 through 2.000, +0.004, -0.000; for sizes 2.062 through 5.000, +0.005, -0.000; for sizes 5.250 through 6.000, +0.006, -0.000; for sizes 6.250 through 7.500, +0.008, -0.000.
Related Resources: